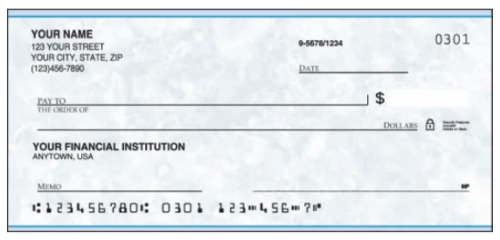
Filling out a personal check might seem tricky at first, but once you understand the different parts and what goes where, it’s actually pretty simple. Here’s a step-by-step guide on how to correctly fill out a check:
1. Date
-
- Location: The top right corner of the check.
-
- What to write: The date you’re writing the check. You can use numbers like “9/16/2024” or write it out like “September 16, 2024.”
Tip: Make sure the date is correct, especially if the check needs to be cashed or deposited by a certain time.
2. Payee
-
- Location: On the line that says “Pay to the Order of.”
-
- What to write: The name of the person or company you’re giving the check to. This could be your friend’s name if you owe them money, or a store’s name if you’re paying for something.
Tip: Write clearly and make sure the spelling is correct, because only the person or business named here can cash or deposit the check.
3. Amount in Numbers
-
- Location: The box on the right side next to the payee line.
-
- What to write: The amount of money you’re paying, written in numbers (e.g., 50.00).
Tip: Start writing the number close to the dollar sign to prevent anyone from adding extra digits.
4. Amount in Words
-
- Location: The line under the “Pay to the Order of” section.
-
- What to write: The same amount as above, but this time written out in words (e.g., “Fifty and 00/100”). If there’s change, write the cents as a fraction out of 100 (e.g., “Twenty-five and 50/100”).
Tip: This is super important because banks use this part to confirm the amount. If the numbers and words don’t match, the bank might not accept the check.
5. Memo
-
- Location: In the bottom left corner of the check.
-
- What to write: This part is optional, but you can write a note about why you’re writing the check (e.g., “Lunch” or “Rent for September”). It helps you keep track of your payments.
Tip: If you’re paying a bill, the company might ask you to write your account number here to make sure they credit the payment to the right account.
6. Signature
-
- Location: The line in the bottom right corner.
-
- What to do: Sign your name exactly as it appears on your bank account.
Tip: Without a signature, the check is invalid. Make sure it matches the name on your account.
Now, with all the parts in place, your check should be complete! Here’s a quick review of how the check looks when it’s filled out:
-
- Date: Today’s date.
-
- Payee: Who you’re paying.
-
- Amount in Numbers: How much you’re paying, in numbers.
-
- Amount in Words: How much you’re paying, in words.
-
- Memo: Why you’re writing the check (optional).
-
- Signature: Your name, just like it’s on your bank account.
Make sure to keep a record of the check in your checkbook register so you know how much money you’ve spent. This will help you manage your finances!